The remote computer requires Network Level Authentication on Windows 11/10/8/7
If you are trying to connect to a computer remotely, but an error message is appearing continuously, you might not be able to connect to that remote computer. Although this error message should not appear, Windows shows such a warning when the required authentication doesn’t meet. When you are trying to connect to a computer remotely, your host computer must have the correct permission or that remote PC should have the correct settings. Otherwise, you will end up getting such a problem all day long. Sometime, you might get “The remote computer requires Network Level Authentication (NLA)” error message after restoring the PC using a system restore point.

The exact error message looks like this-
The remote computer requires Network Level Authentication, which your computer does not support. For assistance, contact your system administrator or technical support.
However, many people have got another error message, which is caused by the same thing. The other error message is-
The remote computer that you are trying to connect to requires network level authentication (NLA), but your windows domain controller cannot be contacted to perform NLA. If you are an administrator on the remote computer, you can disable NLA by using the options on the remote tab of the System Properties dialog box.
No matter what remote desktop tool you are using, you will keep getting a similar error message until or unless you make the mandatory changes.
To fix The remote computer requires Network Level Authentication issue on Windows 10/8/7, follow these following solutions-
- Tweak Remote Desktop security settings
- Disable NLA using Group Policy Editor
- Disable Network Level Authentication using Registry Editor
- Turn off NLA using PowerShell
In a nutshell, you need to disable the Network Level Authentication or loosen up the settings so that the remote computer can connect to the host machine without any error.
Solution #1: Tweak Remote Desktop security settings
By default, your Windows 11 machine allows connections only from computers that have Network Level Authentication. This inbuilt security function lets you block all the unwanted connections when you have a large local area network, and your computer is open for share. You can change the network location from public to private and vice versa as per your requirement. However, the same settings can cause the issue as mentioned earlier. Therefore, you can try to disable this option and check if the problem remains or not. Following the following steps to allow connections without NLA.
- Open This PC on your computer.
- Right-click on empty space and select Properties.
- On your right-hand side, you should find an option called Advanced system settings. You need to click on this option.
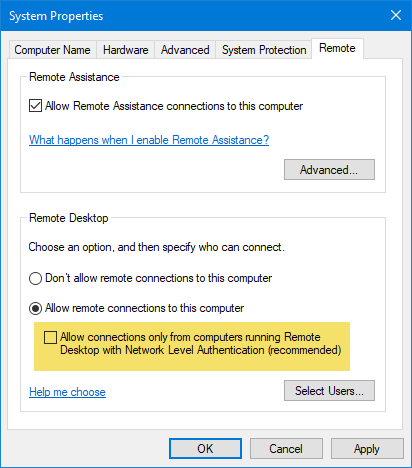
- Switch from Advanced tab to Remote
- Alternatively, you can press Win + R, type sysdm.cpl and hit the Enter button.
- Make sure Allow remote connections to this computer option is selected. If not do choose this option and remove the tick from the checkbox called Allow connections only from computers running Remote Desktop with Network Level Authentication.

- Click the Apply and OK buttons to save your change.
After that, try to connect to the remote computer.
Solution #2: Disable NLA using Group Policy Editor
You can disable the Network Level Authentication with the help of Group Policy Editor. This is much more user-friendly, and you do not need any expert knowledge to get it done. The only drawback is you cannot get Local Group Policy Editor on Windows 10/11 Home version. Even if you sideload Group Policy Editor, you might not get the similar option in that third-party app. Therefore, this method is applicable to Windows 10/11 Pro and Enterprise users only.
- Open Local Group Policy Editor. You can search for it in the Taskbar search box. Or you can enter gpedit.msc in the Run prompt.
- After opening it, navigate to this path-
Computer Configuration > Administrative Templates > Windows Components > Remote Desktop Services > Remote Desktop Session Host > Security
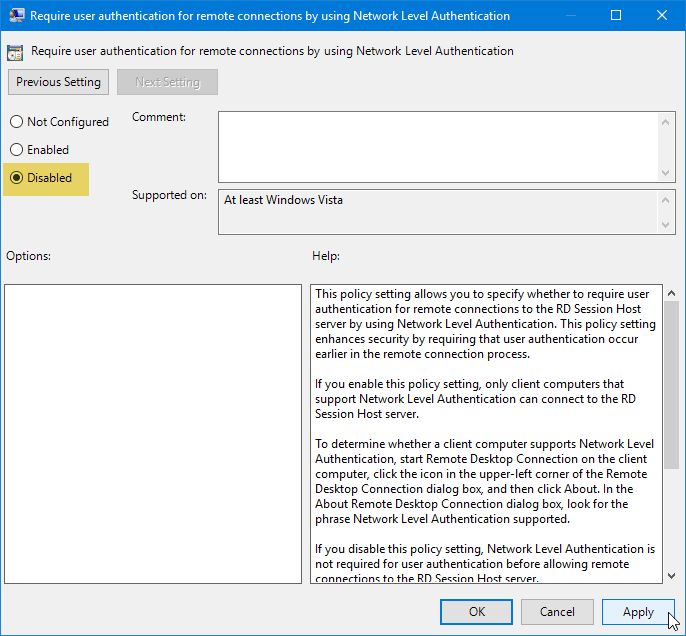
- On your right-hand side, you should find a setting named Require user authentication for remote connections by using Network Level Authentication. Double-click on this setting to open the Properties.

- Make sure the Disabled is selected. If not, do choose that option and click the OK button to save your change.
Solution #3: Disable Network Level Authentication using Registry Editor
Network Level Authentication can be blocked via Registry Editor as well. However, you need to do that on the remote computer. This is quite easy when your host computer is connected to the remote computer via Local Area Network. In any case, if your Windows registry editor is disabled accidentally or by the syatem administartor, first enable the Windows registry editor. The advantage of this method is you can get Registry Editor on any version of Windows 11/10/8/7.
- Open Registry Editor. You can either search for it in the Taskbar search box, or you can enter regedit in the Run prompt.
- Go to File > Connect Network Registry.
- Enter the name of the remote computer and click the Check Names You should find the remote computer’s Registry Editor on your host computer.
- After opening Registry Editor of the remote computer, navigate to this path-
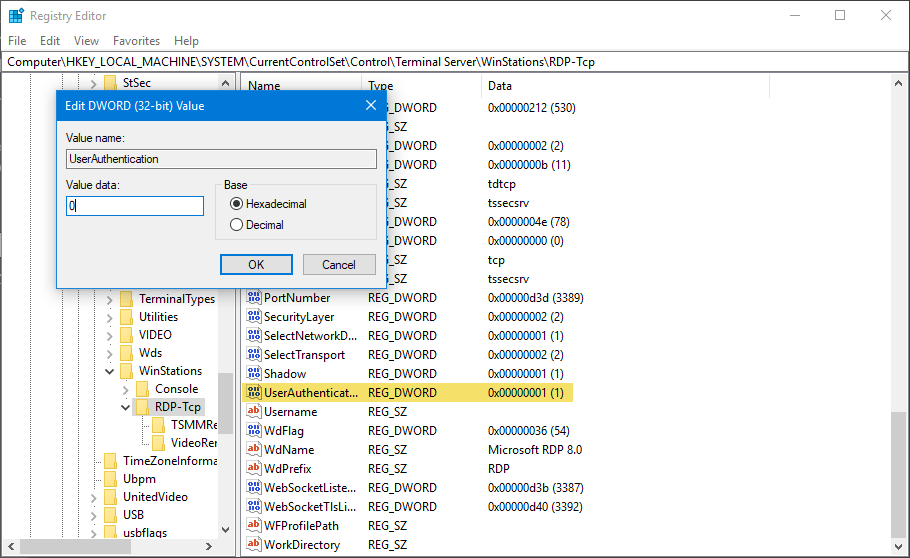
HKEY_LOCAL_MACHINE >SYSTEM > CurrentControlSet > Control >Terminal Server > WinStations > RDP-Tcp
- Here you can find two keys i.e. SecurityLayer and UserAuthentication. Open one after one and set the value to zero(0).

- After that, open PowerShell and enter this command-
restart-computer
After that, if you can connect to the remote computer via Remote Desktop.
Solution #4: Turn off NLA using PowerShell
To turn off or disable Network Level Authentication with the help of Windows PowerShell, you need the remote computer name. Otherwise, this is not possible to get started with this method. If you have collected that, go ahead and follow these steps.
- Open Windows 11 PowerShell with administrator privilege. For that, search for ‘powershell’ in the Cortana search box > right-click on the corresponding result > select Run as administrator.
- Enter the following commands one after one-
$TargetMachine = “remote-computer-name”

(Get-WmiObject -class “Win32_TSGeneralSetting” -Namespace root\cimv2\terminalservices -ComputerName $TargetMachine -Filter “TerminalName=’RDP-tcp'”).SetUserAuthenticationRequired(0)
Do not forget to replace the remote-computer-name with the actual name.
- Restart computer.
Here is a list of powershell commands to uninstall and reinstall built-in Windows system core apps of your choice.
Final Word
To fix The remote computer requires Network Level Authentication error in Windows 11/10/8/7, you must have to disable or turn off Network Level Authentication (NLA). Otherwise, this is not possible to connect to the remote computer even if both machines are in the same Local Area Network. You can try any aforementioned method to disable NLA. However, if you do not know what you are doing and you want to go through some simple steps, I would recommend you to use the first or second method.
Also useful: How to get WIndows XP HyperTerminal for Windows 11/10/8.1/7.


