How to Solve Running Out of Disk Space on C Drive in Windows 10/8.1/7
Windows 10 users can get the running out of disk space alert message after updating the PC from Windows 7 and Windows 8.1. This error message creates a problem to Windows 10 users as their PC gets slower due to unavailability of enough free space on installation drive, i.e. C drive. When you upgrade the PC to Windows 10, it stores and backs up all the older files from the previous version of OS so that you can revert all the changes and downgrade your PC any time by uninstalling Windows 10 OS. Due to presence of windows old files, the size of installation space increases significantly. So, you might get the running out of the disk space error message.

If you delete the old Windows files, you could free up the disk space up to 20 to 25 GB. This space reclaiming process is very easy and by using Windows disk clean up utility the space can be freed up. Many more factors are included for running out the hard drive disk space in every Windows version, including Windows 10, Windows 8.1 and Windows 7. In this article, we cover all the possible solution to get rid of such a disk space problem.
Solve Running Out of Disk Space in Windows 10/7/8.1
Step #1. Use Windows Disk Clean Up to Free Up Disk Space
Disk clean up is a built in tool of Windows OS to delete unimportant and temporary files. Thus you can free up your disk space up to a certain level. Disk clean up is much more effective to Windows 10 users who update their PC from an earlier version. Let’s see how to reclaim more disk space by deleting old and temporary junk files from C:\ drive.
- Right click on the disk drive you want the space to be freed up.
- Click on Properties.
- Tap to
Disk Cleanupbutton. - It shows you a list of temporary files. Choose what you want to delete.
- Then press
Clean up system filesbutton. - Press
OKthen to free up disk space by deleting the Windows temporary internet files, set up log files, downloaded program files etc. - Then navigate to More Options tab.
- Tap/click the
Clean upbutton under system restore and shadow copies section. - Thus, you can delete all the auto created Windows system restore points and freed up the installation disk space.
Step #2: Merge or Extend Partition to Get More Space
You can use MiniTool Partition Wizard software to extend any hard drive partition. You can use this tool to merge two hard drives or two separate partitions.

- Download MiniTool Partition Wizard and install it to your PC.
- Open the software and you will find all the existing Windows hard drive partitions.
- Click on the drive you want to add more space. Right click on it.
- Select Extend or Merge option from there.
- Then select another partition from the drop down list from where you want to take free space.
- Adjust the amount of free space you want to take.
- Click OK to complete the task.
MiniTool Partition Wizard download link:
http://www.partitionwizard.com/
Step #3: Uninstall Built-in Apps and Games to Acquire More Space
If you uninstall all the unnecessary built in applications from your Windows 10 OS, you can free up disk space at a certain amount. Though, it is not easy to delete or uninstall all the system apps from a Windows installation copy. However, if you are running out of disk space on C drive, you need to uninstall those buil-in apps like weather, maps, news and many more.
Read this guideline to uninstall all pre installed apps in your Windows 10 PC.
Step #4: Compress Files and Folders to Get More Disk Space
By compressing the files on a partition or on a hard drive, you can save disk space easily. If your hard drive gets full, you can use file compression method to get more disk space.

- Right click on any drive and select Properties.
- Select the check box compress this device to save disk space.
- Click on
ApplyandOK.
Step #5: Delete Documents, Pictures, Downloaded Files from Windows Installation Drive
Generally all the downloaded files, received documents are stored in the Downloads folder of a Windows installation directory. If you set a different directory, the chances of getting C drive disk space running out error minimize. You can manually move the downloaded files to a separate location otherwise.
Step #6: Find and Remove Duplicate Files and Unused Large Files
Duplicate files can capture the disk space at a great rate. When you save a same file in different location, then those files are called duplicate files. Identical files waste the drive space and you need to find and eliminate those ones to get lost space back. To remove duplicate files in Windows follow these steps.
- Open search dialogue box by pressing
Windows+Fbuttons together. - Type the name of the file in the search box.
- In the tool bar, click Details option to view the files.
- Now, search for files with identical name, extension and date modified option.
- If the dates are same, probably the files are duplicate and you need to eliminate them.
You can use the same technique to eliminate large files from a drive in Windows.
Step #7: Move User Profile to New Location
Every user profile consumes a very large amount of disk space on the Windows installation drive. In my case, the current user profile occupies almost 17GB disk space. If you have less memory in Windows C drive then you can move Windows user profile to a new location. The process is not so easy. Try these steps to get the thing done.
- Log in to the user profile that you want to move to another drive.
- Open Windows explorer and navigate to C:\Users\{User Name} folder.
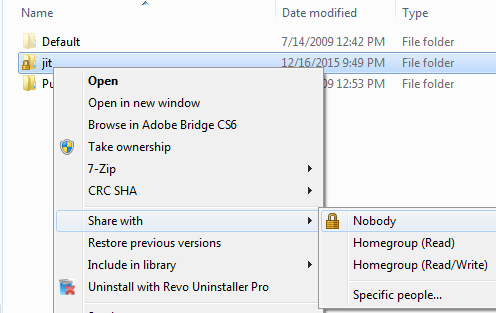
- Right click on the folder and select share with option and choose Nobody.

- Log off the computer and sign in using a different administrative account.
- Select the user profile folder that you want to move and make a copy of it.
- Paste the folder to the new location. In my case, I have moved the folder to
E:\drive. - Now close the Windows explorer and open Windows registry editor.
- Navigate to the location below.
HKEY_LOCAL_MACHINE\SOFTWARE\Microsoft\Windows NT\CurrentVersion\ProfileList
- Check the s-1-5 key under profilelist key to find user account name, path etc. Modify the ProfileImagePath value and type the current path value of user profile folder to there from the right section.
- Log off or Restart your PC and log in to that user account that you have moved.
- From the start menu, open the user profile folder.
- Right click on Desktop folder and select properties from the right-click context menu.
- Under location tab, you will find the current location of the user profile folder.
Step #8: Turn off System Protection for Hard Drive

To save some space on a particular disk of Windows, you can turn of system protection. If you turn the system protection off, you can’t save any system restore points and all the previous restore points will be deleted. To turn the feature completely off –
- Go to My PC/Computer from start menu, right click on it and select properties.
- Select system protection from the left pane and you need the administrative privilege to turn the feature on or off.
- Under protection setting, click the disk for which you want to turn off system protection. Next click configure option.
- Click Turn off system protection and select OK.
Step #9: Change the Amount of Disk Space Usage by Offline Files
Press Windows start button and from the search find offline files.

You will find Manage offline files there. Open it and navigate to disk usage tab.
Choose Change limits button to manage the maximum number of space for all offline files and temporary files.
Step #10: Remove DoSVC Files
Delivery Optimization Service files will be stored in the C:\Windows\Logs\dosvc location of Windows 10. Sometimes the files consumes a lot spaces as Windows 10 can’t remove those files automatically. So, at times, it consumes lot more C drive spaces. However, to remove DoSVC files open Windows services and stop the delivery optimization service, make the auto start-up of the service disable. Then reboot the PC and delete unnecessary files manually from C:\Windows\Logs\dosvc folder.
Thus you can recover Windows disk space running out problem in Windows 10.
Step #11: Analyse Disk Space
You have done a great job so for to get rid of running out of disk space on C drive of Windows 10 / 7 / 8.1 OS. Hopefully, you manage to save a lot of Windows installation drive disk space. At last to make yourself confirm, you can use any disk analyser tool to check the total disk space usage and try to figure out additional solution if any. You must delete Internet Explorer browsing history and the browsing history and cache memories of Chrome browser also. To delete all the internet browsing history automatically you can follow this guide.
The above tutorial helps a lot to the Windows users having a lesser amount of available storage to their installation directory. Just follow each and every step to recover your PC from running out of disk space error.

![[Fix] You’ll need a new app to open this ms-windows-store error Windows 10/Windows 11 7 solve You’ll need a new app to open this ms-windows-store error windows 10](https://www.techperdiem.com/wp-content/uploads/2017/08/need-a-new-app-to-open-ms-windows-store.png)

