Fix 100% CPU Usage Problem in Windows 10 or Windows 11
Even if you are running multiple high-end apps, your computer should not use 100% CPU resources. If it if using a considerable amount of resource, there is a very high chance of getting various problems on your computer because of high CPU stress. If your computer is using 100% CPU, here is what you can do to fix the problem.
Many people use more than one high-end software such as Android Studio, VirtualBox, VMware, Adobe Premiere Pro, etc. simultaneously. Sometime, people use high end software to play android games on PC. If you are doing such thing and getting 100% CPU usage problem in Windows 11/10/8/7, there is nothing you can do. However, if you are running some small portable tools, doing basic browsing, etc. but you are getting a similar problem, do check out the following solutions.
There is no specific solution you can use to troubleshoot high CPU usage problem in Windows 11/10. It can occur due to any reason. Solutions depend on the app or service, which is responsible for this issue. However, we have consolidated some basic solutions as well as service-specific solutions so that you can fix it quickly.
What happens when your computer uses 100% CPU?
I have got the motherboard, CPU, RAM, etc. so that apps can use them – this is a partially correct statement. If apps are using the complete resource, different problems may occur. For example-
- Your computer will be slow. In fact, you may not access your computer at all.
- Your browser will not open any website. Forget about YouTube; you cannot open google.com in your browser.
- Windows Explorer might show a blank screen.
- Apps won’t start or close.
- You cannot turn off your computer.
- It becomes very difficult to open Task Manager to manage tasks.
These are some common problems that people encounter frequently. There are more other issues you might get if your computer is 100% of CPU resources.
To fix 100% CPU usage problem in Windows 10/Windows 11, do follow these suggestions-
- Close apps
- Restart service
- Scan PC with antivirus
- Disable antivirus
- Remove Adware
- Tweak Registry file
- Disable update downloads from other PCs
- Install pending updates
Solution #1: Close Apps
This is a basic and temporary solution that you can use to fix this issue. If a significant amount of resource is being used, there is an app (or apps) behind that for sure. You need to find that out and close that as soon as possible. If there is a problem in the app’s internal files or service, you might get help from this solution. However, chances are you will end up getting the same issue after restarting your computer or the same app.
That is why you need this following solution.
Solution #2: Restart Service
A service helps an app to run in your system. No matter whether it is an inbuilt app or third-party software, you can find the corresponding service. You need to find out that service and try to restart it. Many times, the restart handles all the background processes and backend issues of that app and as a result, you can start getting a smooth experience. To find out the service of an app, which is causing this issue, do follow these following steps.
- Open Task Manager and make sure you are in the Processes
- Find out the process that is killing your PC.
- Right-click on it and select Go to details. It will redirect you to the Details tab and the corresponding app will be highlighted.
- Right-click on the highlighted app > Go to service(s). It will redirect you to the Services
- Right-click on the highlighted service and select Restart.

This is also possible to stop the service by choosing the respective option. If you do not want to go through all those aforementioned steps, you can open the Services panel, find out the service and restart it manually.
These are the two most common and working solutions to this problem. However, here are some of the other tips and tricks you can check out.
Solution #3: Scan PC with Antivirus
If your computer is under a virus/malware/trojan attack, there is a very high chance of getting high CPU usage problem on your computer. That is why you should scan your computer with a reliable antivirus. Not only the C drive or system drive but also you should scan your whole computer. Do not forget to scan the browser as well. Even if you haven’t installed any toolbar or such, don’t skip the browser from the scanning list. You can check out some of the best free antivirus software for Windows computer.
Solution #4: Disable Antivirus/Security Shield
If you are using a low-end configuration and you have installed a security tool like Avast, Bitdefender, etc., there is a chance of getting a similar issue. From the initial days, those tools have been making the low-end systems slower. However, this is not confirmed whether your antivirus is responsible for this issue or not. That is why you should disable it temporarily and check if the problem remains or not. If you are getting the issue after disabling, this is the time when you need to uninstall it.
Solution #5: Remove Adware
As attackers are making advanced adware, most of the antivirus tools cannot detect Adware. The bad news is adware can consume a lot of CPU resource to install and run various junk apps to show unnecessary advertisements. If you have mistakenly installed adware, you have to remove it as soon as possible. AdwCleaner is a well-known, handy, and free adware removal tool available for Windows 11 or Windows 10/8/7.
Download AdwCleaner: https://www.malwarebytes.com/adwcleaner/
Solution #6: Tweak Registry File
If you have started getting this problem after enabling Cortana on Windows 10/11, you should try this solution. With the help of this tweak, you can delay the start of Cortana. To get started, do follow these steps.
- Open Registry Editor. For that, press Win + R, type regedit and hit the Enter button.
- Navigate to this path-
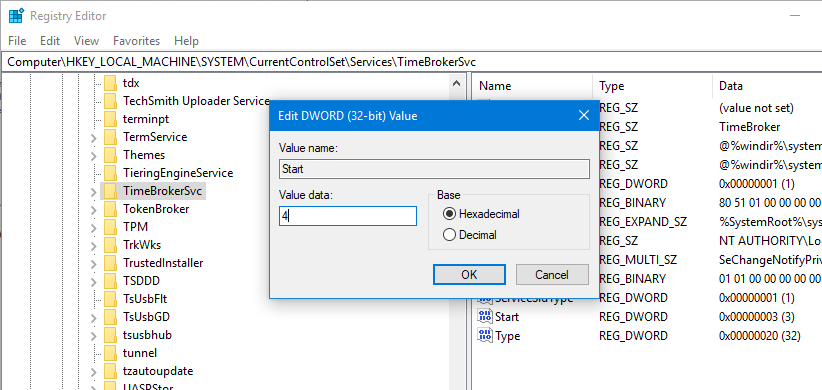
HKEY_LOCAL_MACHINE\SYSTEM\CurrentControlSet\Services\TimeBrokerSvc
- Here you can find a key called Start. Double-click on this key and set the value as four (4).

- Save your change.
After that, check if you can run everything smoothly or not.
Solution #7: Disable Update Downloads from Other PCs
Windows 11 lets you download updates from other PCs on your local network. The same service can create the high CPU usage problem on Windows 10/11 PC. If you do not need this functionality and you can download the updates separately, you can follow these following steps to block Windows 11/10 from download updates from networked PCs.
- Press Win + I to open Windows 10/11 Settings panel.
- Go to Update & Security.
- In the Windows Update section, select Advanced options.
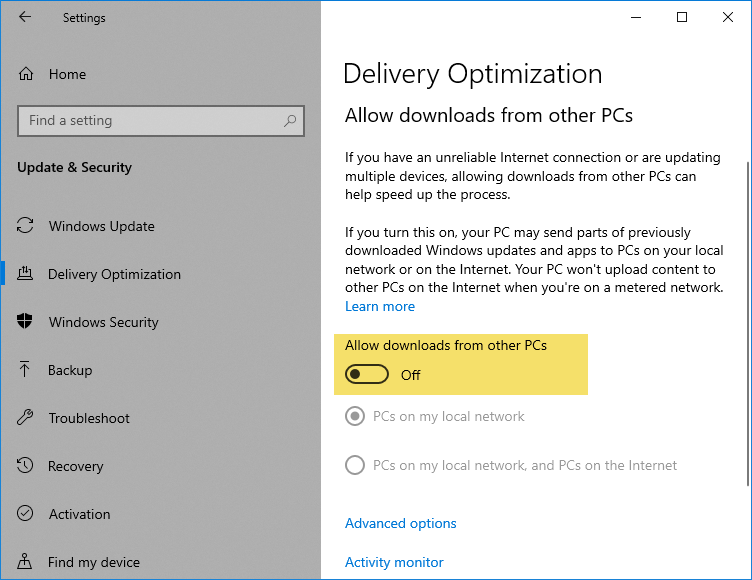
- Scroll down and click the Delivery Optimization
- Toggle the button that says Allow download from other PCs.

Check if the problem is gone or not.
Solution #8: Install Pending Updates
If none of those above-mentioned tips and tricks is not working for you, that means there is a bug if your system. You have to wait for the official statement. Also, if you haven’t installed any update, don’t forget to do that. Sometimes Microsoft rolls out patches right after a feature update to fix common issues like this one.
Final Word
If you are using the Windows 10/11 Insider Preview, this is a very common problem for your system. However, if you are using the stable release but still you are getting this problem, you should follow these aforementioned guides to fix 100% CPU usage issue in Windows 11/10/8/7.


![[Fix] Portable/External Hard Drive Not Recognized on Windows 11/10/8.1/8 6 uninstall usb driver and BUS controller](https://www.techperdiem.com/wp-content/uploads/2017/06/uninstall-usb-bus-controller.png)