How to Enable Microsoft Virtual WiFi Miniport Adapter and Setup Wi-fi Hotspot
Microsoft virtual wi-fi Miniport adapter is the latest addition to Windows operating system which virtualizes your network adapter and converts one physical wireless adapter into two or more virtual adapter. The first one can be used as a normal wireless network adapter (to connect the PC to a network) when the second virtual wi-fi adapter can be used to connect to another ad-hoc network or to create a wi-fi hotspot (to connect other devices to the windows PC wirelessly). Microsoft has added this “virtual wifi miniport adapter” feature in Windows 7 and later versions of Windows OS i.e. Windows 8, Windows 8.1 and Windows 10.

I have found the feature first time on my own laptop when I was getting a network connection issue. When I opened the network connections window, I noticed the virtual wifi adapter in the existing adapter list. After reading few relevant articles regarding Microsoft virtual wifi mini port adapter, I gathered a lot of knowledge and now I’m sharing it with you.
The virtual wifi miniport adapter is very much similar to what the virtual machine or VMware does. The entire OS is virtualized by the VMware virtual machine, whereas, Microsoft’s virtual wifi miniport adapter just converts the physical wireless adapter into two virtual adapters – one for WiFi and other for a wireless hotspot. Though the feature is very new and is disabled by default, you can create your own wireless access point either by using windows command or by using a third-party windows software like Connectify.
Setup Virtual Wireless Access Point Using Command in Windows 10/8/8.1/7
- Connect your windows computer to any network using Ethernet cable. If you are connected to a network using wi-fi, you can’t create wi-fi hotspot and virtual wireless access point. You can’t access the internet and create the wi-fi hotspot using a single network adapter. However, if you use two network adapters on your PC, you can connect to a network using one adapter and create the wireless hotspot using another adapter.
- Check whether you have installed the wireless network adapter on your windows computer or not. If you are running on a Windows 10 PC then, press windows+X together and select “Network Connections”. All the installed network adapters are listed there. If you have a wireless network adapter installed on your computer, you can see an adapter labeled as ‘wi-fi’. If not, then try to install the adapter using an ethernet/USB internet connection. If you are a windows 7 user, just open the run dialogue box, type ‘ncpa.cpl‘ and press ‘Enter‘. You will be redirected to “network connections” window with a complete list of available network adapters.
- Open the command prompt using administrative privilege. Windows 10 users can select “Command prompt (admin)” option from the Win+X menu option. Other windows users can open the command prompt as admin by doing the right-click and select the “run as admin” option.
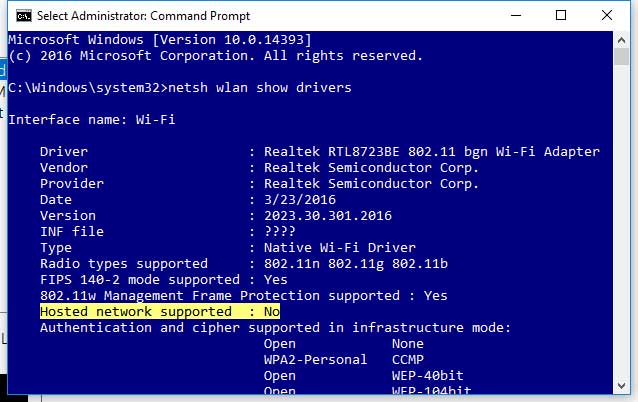
- Every adapter does not have the support of creating a wireless network. To check the support of creating a wifi hotspot for your adapter, just use the following command:
netsh wlan show drivers

If Hosted network supported says ‘Yes‘, then you can create a wireless hotspot using the existing adapter in Windows OS.
Alternatively, press Win+R together to open the ‘Run’ dialogue box. Write devmgmt.msc there in the box and press OK to open the “Device Manager”. Under network adapters, check the “Microsoft Virtual Wi-Fi Miniport Adapter” entry for confirmation. - Now, enter the command to create virtual miniport wifi adapter or wireless hotspot.
netsh wlan set hostednetwork mode=allow ssid=VirtualNetworkName key=Password
All the virtual access point is encrypted with WPA2-PSK (AES) encryption. Change the ‘VirtualNetworkName’ with the name you desire. And change the ‘password’ with a strong password. - To enable the wi-fi hotspot by typing the following command:
netsh wlan start hostednetwork - Now, again open network connections window and select newly created adapter from the list of already installed network adapters. Right-click on the network connection that is used by your PC to access the internet. If you use ethernet for network connection, then choose active ethernet network adapter. If you are connected using wifi, then choose the wireless adapter. Go to ‘Properties’ option. Navigate to sharing tab to open internet sharing settings window.
- Check the box that says “Allow other network users to connect through this computer’s Internet connection”. On checking the option you allow the internet connection of your computer for sharing with other devices. If you want to connect other devices wirelessly, then you need to enable Microsoft virtual wifi mini port adapter. In case you want other devices to be connected using USB, then just use the USB port to for internet sharing.
- Select the new network from the drop-down list which is marked under “Home networking connection” option. Make sure to choose the proper network adapter i.e. virtual wi-fi miniport adapter. Now, you need to setup the wireless access point manually (if you have not properly set it before) on the virtual adapter by using the same windows command mentioned earlier:
netsh wlan set hostednetwork mode=allow ssid=VirtualNetworkName key=Password - Connect the devices using the wireless network to a new wireless hotspot. If you are an android or iOS user, then turn on the wifi of your mobile and scan for available networks. You will find a new wireless network to be connected.
Note: To enable the wi-fi network/wireless network use the command — netsh wlan start hostednetwork
To see details about the hosted network (which are connected to your PC) use the command — netsh wlan show hostednetwork
If you want to stop the network broadcasting, you can disable the service using the following command — netsh wlan stop hostednetwork
If you do a mindset to disable the hotspot permanently, you should use the command — netsh wlan set hostednetwork mode=disallow
Windows 7 and windows 8 users can download virtual router from “http://virtualrouter.codeplex.com/” to start the broadcasting using Microsoft virtual wifi miniport adapter.
Use Third-party Windows Software to Create a Virtual Wireless Network or Wi-fi Hotspot Service
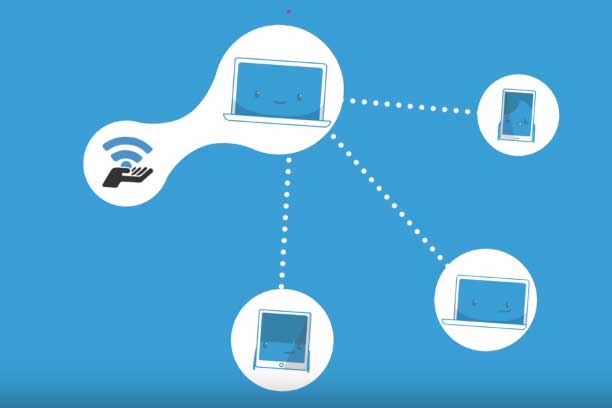
You can take care of third-party apps to create a portable hotspot for your PC instead of command line activation of “Microsoft Virtual WiFi Miniport Adapter” wireless network broadcast. Though command line technique works well for me, yet some people love to do the same task using a beautiful graphical interface. The third-party apps like Connectify, Baidu WiFi hotspot, Virtual router plus, MyPublicWiFi does the same thing that the commands do. Most of them are free. Just download and install on your PC. Follow the on-screen instructions to make things done with the software.

Create WiFi Hotspot Using ‘Connectify’
- Download and install connectify from “connectify.me”.
- Run the installer and after successful installation restart your computer.
- Start connectify and create a virtual wireless network.
- Depending upon the computer’s firewall configuration, you may be asked to allow connectify for the current network. To use connectify, you need to give permission to connectify for accessing your current network.
- Select your internet connection from your PC (the network in which your are currently connected) under “Internet to share” field of Connectify software.
- You can give a name to the hotspot service you are sharing.
- Give a password to secure the network. Otherwise, anyone within the signal range can access your network. So, must make the connection secure by providing a password.
- At last, press the “Start HotSpot” button to create a wireless hotspot network. Any device having the password can access your internet data for free using it’s WiFi service.
Use “WiFi Sense” of Windows 10 for WiFi Hotspot or Wireless Internet

Windows 10 has a new feature to share your WiFi with your family, friends, and contacts (Skype, Facebook etc.). In order to enable “WiFi Sense” you should have a Windows 10 OS logged in with Microsoft account. The receiver who have a windows 10 PC or mobile, can access your network even without knowing the password. It is the secure most way to share the WiFi to family members, friends, and contacts with lesser effort. To enable WiFi Sense, navigate to Settings >> Network & Internet >> WiFi
Note: Windows local account users can’t be benefited with WiFi Sense by Microsoft.
Microsoft Virtual WiFi Miniport Adapter Reinstallation Guide on Windows PC
You must be aware of the fact that using the Microsoft Virtual WiFi Miniport Adapter Windows users can share their internet/network to others wirelessly. Sometimes, the driver gets corrupted and you find different problems while creating the WiFi hotspot service from your computer. To troubleshoot the problem, you may need to reinstall the driver software on your PC. The reinstallation procedure is very simple and is as follows:
- Open Windows Device Manager in a new window and get the list of all available network adapters.
- Click on the arrow beside Network adapters and right-click on “Microsoft Virtual Wi-Fi Miniport Adapter“.
- Select the ‘Uninstall‘ option.
- Reboot the PC.
- Open the device manager again and click on the actions tab from the top menu.
- Select “Scan for hardware changes…” option.
- The WiFi adapter will be reinstalled to your Windows automatically.
Microsoft Virtual WiFi Miniport Adapter is a brilliant addition to Windows OS. This lets you share internet/network connection wirelessly. Learn, how to take full advantage of the wireless adapter.
Also useful: Kick-off someone from WiFi network


