How to Connect Two Computers on Lan Using Ethernet Crossover Cable in Windows OS
If we have two computers in our home, then we often need to share files, photos, important documents, software, movies between the two PCs. Generally, we use USB flash drive or external hard drive to move these files. Some of us love to use cloud services like Dropbox and Google drive to share files among computers. Both of the above method have some drawbacks. Transferring files via USB pen drive takes a lot of time as it requires copy-paste procedure two times to move files between two PCs. And the second procedure consumes more data as it passes through multiple download and upload procedure. Sharing files using crossover Ethernet cable is another way to send files from one PC to another. This is probably the quickest, safest and easiest way to share files between two computers within a very short period. To share files, movies, large games etc., we need to connect two computers in a LAN using a Ethernet crossover cable. The procedure of the file sharing is applicable to any major OS like Windows, Linux and Mac.
The main advantage of a Ethernet cable is the data transfer rate is comparatively faster than any other known process. The main requirement for this procedure is a straight Ethernet cable RJ45 or using a crossover Ethernet cable which is very much cheaper than any networking hardware module. There is slight difference between the straight Ethernet cable and crossover Ethernet cable. A crossover cable is mainly used for file transfer whereas a straight Ethernet cable is used for various purposes. Crossover Ethernet cable is available at on-line shopping portal and local computer outlet. Alternatively, you can use a Cat-6 crossover adapter as well. The below picture shows the difference between crossover Ethernet cable and straight Ethernet cable.
 Network adapter and network drivers are the integrated part of a modern day’s PC. Those who are using an older model PCs, must need to install the USB network adapter or LAN card (to convert USB to RJ45 port) to connect two PCs in LAN via crossover Ethernet cable for sharing files.

Steps to Connect Two Windows 10/7 Computers with Ethernet Crossover Cable to Share Files
Connect the two PCs with the Ethernet wire and be sure that two computers (which are connected by the cable) are of the same home group or work group. If the the groups of the two computers are different, then file sharing using Ethernet cable is not possible. Then, configure the computers to create a home network with a single physical wire.
Method #1: Configure Two Computers to Share Files:
- In order to establish a Ethernet file sharing connection, at first we need to assign two different IPs for the both PC. For this, you need to make changes in LAN adapter settings.
- Navigate to Control Panel >> Network and Internet >> Network and sharing centre >> Change Adapter Settings (from the left pane). Alternatively press
Windows+Rtogether and open Run dialogue box. Writencpa.cplthere and press Enter to open the network connection’s page.
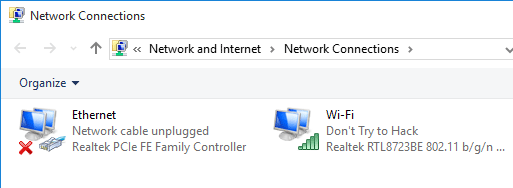
- Select the appropriate connection for your LAN and right click on it, select Properties. Local area connections properties window appears.
- Select Internet Protocol Version 4 (TCP/IPv4) that is found under the Networking tab. Choose Properties to and open it.
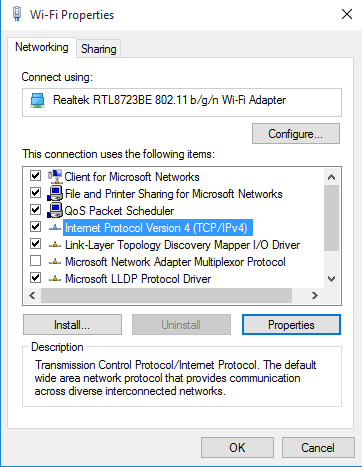
- Set the IP address and subnet mask at the two computers as mentioned below.
For first PC -
IP: 192.168.0.1
Subnet mask: 255.255.255.0

For Second PC -
IP: 192.168.0.2
Subnet mask: 255.255.255.0
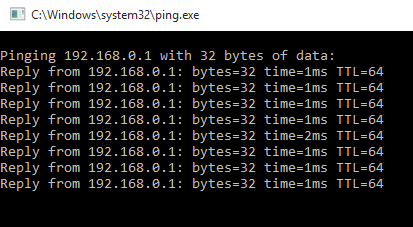
- Now, connect the two end of the Ethernet cable to the network port of two computers and view the shared files and folders from any of the PC. To check the connections, restart both of the PCs and use the below command.
ping 192.168.0.2 -t :from 2nd PC
ping 192.168.0.1 -t :from 1st PC
- Then, right click on Computer or This PC option from the start menu and choose Properties.
- Click on “Change settings” option to open up System Properties dialogue box.
- Click on the Change button to set a Workgroup for each PC. The workgroup name should be same in the both PC, otherwise the Ethernet connection would not work.
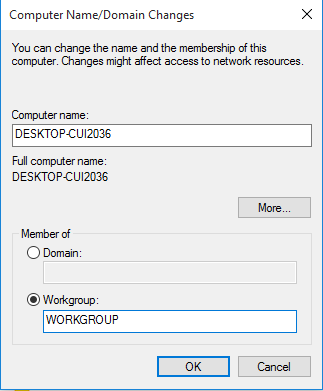
- After that open This PC or Computer from start menu/desktop shortcut, from the left pane select Network. You will find the list of computers there which are connected via Ethernet cable in LAN under the same workgroup.
- Be sure that you have turned on the “Network discovery and File sharing option”. You can make the network as private network.
- Double click on the computer that you find under network window to access the files and folders of the shared section of the second computer.
- You can share a entire drive, for this, just right click on the drive you want to share and select share with >> advanced sharing options. Under sharing tab choose Advanced sharing button and tick the box beside share this folder option. Click OK to apply the changes.
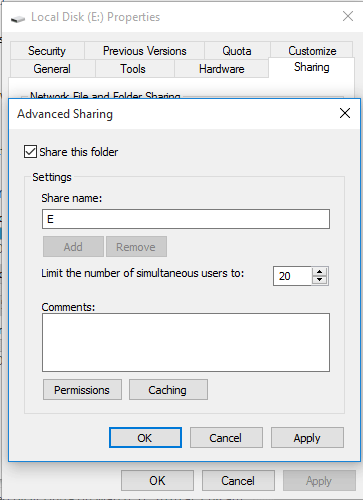
- From the Network section, when you want to access files and folders of the other PC, you might be asked for the passwords. In these fields, you need to enter the correct user name and password of the other PC if it is protected.
Method #2: Share Internet Connection Between Two Computers Using Ethernet Crossover Cable
If you use Ethernet crossover cable to share files between two computers, then you can also share the internet connection of computer to another. It will help you to back up files of the PC that have no internet connection. Let’s see the procedure of sharing internet connection.
- Connect two computers with a single Ethernet cable. Be sure that both of the PCs are under the same workgroup.
- Turn on internet connection sharing of the computer that has already an internet connection. The instructions for turning on internet connections sharing may differ in the different versions of Windows.
If you are Windows XP user: Navigate to Control panel >> Network and Internet connections >> Network connections. Right click on the internet connection you want to share with the other computers and choose ‘Proerties’. Navigate to the ‘Advanced’ tab and then check the box beside “Allow other network users to connect through this computer’s Internet connection” option. Click “OK”. Now, the second computer (which is connected via crossover cable) should have internet access now.
If you are Windows 7/8.1/10 user: Open control panel and search “View network connections” and select the option to open the list of available network connections. Right click on the network connection you wish to share and select “Properties” from there. Go to “Sharing” tab. Under “Internet connections setting” tick the check box that says “Allow other network users to connect through this computer’s Internet connection”. Click “OK” and the other computer should have access to the internet connection of the first computer now and you can browse internet and backup files from the second computer.
In this tutorial, I have described how you can use Ethernet crossover cable and connect two Windows computers. This is a very useful technique for sharing files and internet connection between PCs while those are connected in a local area network.
Related article: Check how is connected to LAN


