Fix: Windows 10/Windows 11 Update Download is Stuck at 99%
While trying to download updates, if your Windows 10/11 update download is stuck at 99% or any other stage and you want to fix that problem, do check out these tips and tutorials. It doesn’t matter which Windows 11 or Windows 10 build you are using, if you are getting such problem, here are the solutions you can try.

Windows Update download can get stuck due to countless reasons. If you can identify the problem, you can quickly switch to that solution. Otherwise, you need to go through all of them one by one.
To fix Windows 11/10 Update download stuck at 99%, you need to follow these steps-
- Install pending updates
- Check Windows Update Service
- Check Windows Update Dependencies
- Run Windows Update Troubleshooter
- Run Disk Cleanup
- Clean Boot
- Run System File Checker
- Reset Windows Update Components
Solution #1: Install Pending Updates
If your computer has already downloaded some updates (& some are still pending), but you haven’t installed them, you might get this error. Sometimes your system needs to have a particular update in order to install another one. Therefore, if you haven’t installed any update for a long time and eventually, you are getting such error while downloading new updates, the first thing you need to do is to install all the pending updates. To do so, a minimal knowledge is required. You can press Alt + F4. Here you should find Update and shut down and Update and restart options. You can use any one of them. Alternatively, you can find different options to restart and shut down the PC direct from the Power button in the Start Menu until you find the start button is not working issue in your PC.
Solution #2: Check Windows Update Service
For each system program, there is a service that can be found in the Services panel. This service helps you get the process running. If somehow or mistakenly, you have made any wrong change in the Services panel, your update may not install or download. Therefore, this is the right choice to check whether the Windows Update service is running or not. To verify that, search for services in the Taskbar search box or Cortana search box and open the respective window. After that, find out the option that says Windows Update and double-click on it to open the Properties. Here you need to make sure the following values are set-
- Startup type: Automatic
- Service status: Running

If these values are not set as mentioned earlier, you can open the Startup type drop-down menu, and select Automatic. Following that, you can click the Start button to run the service.
Solution #3: Check Windows Update Dependencies
Most of the Windows services have some dependencies. In other words, a service requires another service(s) to run properly. Like any other service, Windows Update Service also has some dependencies, and they are-
- DCOM Server Process Launcher
- RPC Endpoint Mapper
You need to open Services panel, and check if these two services are running or not. By default, the Service status should show Running. However, if it is showing Stopped, you can find a Start button, which can be utilized to start the service.
Solution #4: Run Windows Update Troubleshooter
Microsoft has revamped the troubleshooters, and now they are more powerful than ever. That said, you can make use of in-built Windows Update troubleshooter on Windows 11 or on Windows 10 to fix all common update related issues like this. The best part of this redecoration is you can find it in the Windows 11/10 Settings panel.
Therefore, do follow the following steps to run Windows Update Troubleshooter-
- Press Win + I to open Windows Settings.
- Go to Update & Security > Troubleshoot.
- You should find Windows Update Select it and click the Run the troubleshooter button.
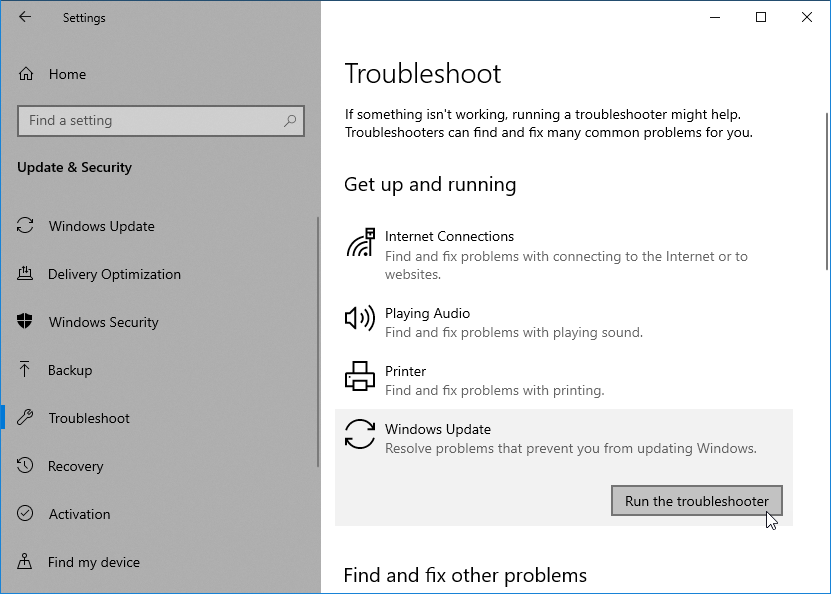
- Follow your screen instructions to get your problem fixed.
Solution #5: Run Disk Cleanup to Remove Unwanted Files
Sometimes temporary files, Delivery Optimization files, system cache, etc. can cause this problem. The best way to get rid of all those junk files is the Disk Cleanup tool. Disk Cleanup is an in-built tool that you can find on Windows 10/11 as well as some other older versions.
To use Disk Cleanup in Windows 11/Windows 10 PC, you need to follow these steps-
- Search for
disk cleanupin the Taskbar search box or Cortana search box and open the corresponding window. - You need to choose the drive that you want to scan or delete files from. This is recommended to choose the C drive or system file, where your Windows 10/11 OS is installed.
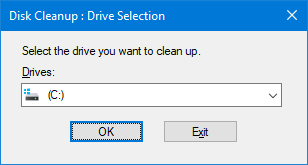
- You can find a window, where you can choose what you want to delete. Make a tick in all the checkboxes and hit the OK button.
If you follow these aforementioned steps, it won’t remove system files. If you want to remove Windows Update related junk files, Windows upgrade log files, previous windows installations and so on, you need to click the Clean up system files button. Therefore, you should find all those options as mentioned earlier.

After removing all the junk files, don’t forget to restart your computer. After that, you can check whether the Windows Update has started downloading or not. If you want to know more in detail on Windows Disk Cleanup, then our tutorial on “How to perform disk cleanup in Windows 10/11?” will be much beneficial for you.
Solution #6: Clean Boot
Sometimes an internal background service can cause this issue. It happens when you install lots of software or driver those require Windows Update service directly or indirectly. Therefore, you can use the clean boot option, which will help you know whether the problem is occurring due to third-party services or not.
To run Clean Boot, you can follow these steps-
- Open System Configuration For that, press Win + R, type
msconfigand hit the Enter button. - Switch from General tab to Services
- Make a tick in the checkbox that says Hide all Microsoft services.
- Make sure rest of the services are selected and click the Disable all
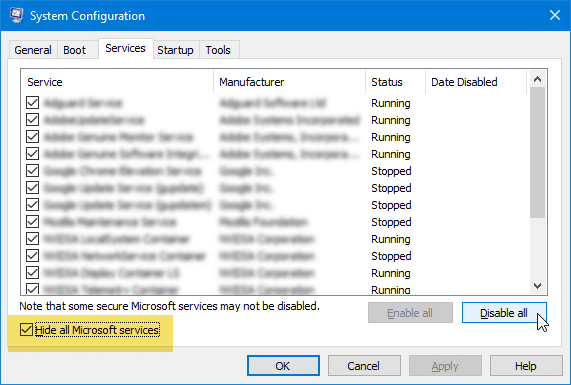
- Hit the Apply and OK buttons accordingly.
- Restart your computer and check if you can download pending updates or not.
Solution #7: Run System File Checker
System File Checker or SFC.exe is an in-built command line tool that scans for changes in all system files. Not only that but also it can restore all the corrupted system files from a cached copy. As Windows Update may get stuck due to corrupted system files, running the System File Checker may solve your problem.
To run System File Checker in Windows 10/11, do follow these steps-
- Open Command Prompt with administrator privilege. For that, search for
cmdin the Taskbar search box, right-click on the respective search result, select Run as administrator. - Enter this command-
sfc /scannow - It takes a couple of minutes. Do not close the window until it finishes the scan.
After completing, restart your computer and try to download updates.
Solution #8: Reset Windows Update Components
To download and install an update, tons of files and services run in the background. That said, if you are not able to download Windows 11/10 updates, you might need to reset Windows Update components.
To reset Windows Update components to the default, you need to follow these steps-
- Open Command Prompt with administrator privilege and enter these commands one after one-
net stop bits
net stop wuauserv
net stop appidsvc
net stop cryptsvc
These commands will stop Background Intelligent Transfer Service, Windows Update Service, Cryptographic Services, and Application Identity Service.
- You need to delete qmgr*.dat file. For that, you can use this command-
Del "%ALLUSERSPROFILE%\Application Data\Microsoft\Network\Downloader\qmgr*.dat"
- After that, you need to enter this command-
cd /d %windir%\system32
- Now you need to re-register all the BITS and Windows Update files. For that, you can enter these following commands in your Command Prompt-
regsvr32.exe atl.dll

regsvr32.exe urlmon.dll

regsvr32.exe mshtml.dll

regsvr32.exe shdocvw.dll

regsvr32.exe browseui.dll

regsvr32.exe jscript.dll

regsvr32.exe vbscript.dll

regsvr32.exe scrrun.dll

regsvr32.exe msxml.dll

regsvr32.exe msxml3.dll

regsvr32.exe msxml6.dll

regsvr32.exe actxprxy.dll

regsvr32.exe softpub.dll

regsvr32.exe wintrust.dll

regsvr32.exe dssenh.dll

regsvr32.exe rsaenh.dll

regsvr32.exe gpkcsp.dll

regsvr32.exe sccbase.dll

regsvr32.exe slbcsp.dll

regsvr32.exe cryptdlg.dll

regsvr32.exe oleaut32.dll

regsvr32.exe ole32.dll

regsvr32.exe shell32.dll

regsvr32.exe initpki.dll

regsvr32.exe wuapi.dll

regsvr32.exe wuaueng.dll

regsvr32.exe wuaueng1.dll

regsvr32.exe wucltui.dll

regsvr32.exe wups.dll

regsvr32.exe wups2.dll

regsvr32.exe wuweb.dll

regsvr32.exe qmgr.dll

regsvr32.exe qmgrprxy.dll

regsvr32.exe wucltux.dll

regsvr32.exe muweb.dll

regsvr32.exe wuwebv.dll
- Now, reset Winsock by entering this command-
netsh winsock reset
- Restart the BITS and Windows Update services using these commands-
net start bits
net start wuauserv
net start appidsvc
net start cryptsvc
- Restart your computer.
After that, check if you can download updates or not.
Final Words:
Windows Update download can get stuck at any level. Nonetheless, if you have got such issues when the download bar is not rising, these solutions can be beneficial for you. Apart from these, also ensure that you have a valid internet connection and you are not using a metered connection.
Also useful: Fix Windows update service is not working error with solution


![Screen Overlay Detected Error on Samsung and Stock Android [Fix] - How to 9 draw over apps for screen overlay Android](https://www.techperdiem.com/wp-content/uploads/2017/06/screen-overlay-detected-error-android.png)