How to Partition Hard Disk of Windows 10 PC Without Formatting
Shrinking or expanding the hard disk volume and creating a new partition without loosing any data is relatively an easier task using modern Windows OS (like Windows 8.1 and Windows 10). Windows Disk Management is the free built-in utility of modern Windows versions which performs all the tasks of creating, deleting, re-sizing the hard disk partitions. The method was first introduced in Windows XP, then in Windows 7 (Professional, Ultimate and Enterprise editions) and it continues to the later versions. A Windows XP user can’t perform additional hard disk partition creation without formatting the hard drive so easily. Windows Starter Edition and Home Basic users can perform free hard disk partition up to a certain limit – that mean, if a Windows 7 Starter Edition user has four partitions in the hard disk of his PC, he will be unable to create any additional shrink volume (fifth partition). Whereas, a Windows Ultimate and Professional users can make a use of it. However, in Windows 10, all the versions including Professional and Enterprise can be used to create a partition of hard disk without formatting or without deleting any data.

Now, learn how to create, re-size and edit any Windows partition using Disk management software of Windows 10. This process does not affect any saved data.
Disk Partitioning in Windows 10 OS without Formatting Hard Disk – How to
1. Press Windows+R together to open run dialogue box.
2. Type diskmgmt.msc in the box of run box and press the Enter button.
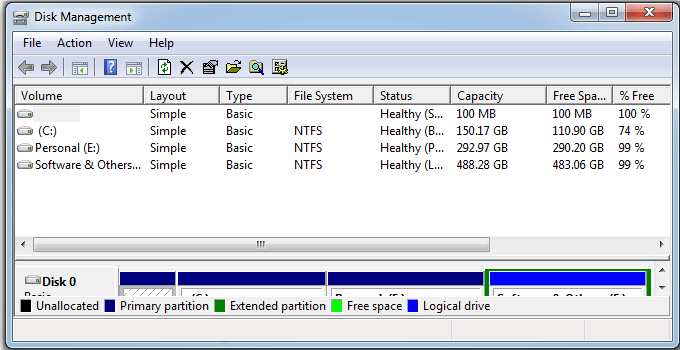
3. The Disk Management windows will be opened up as soon as you press the Enter button. In this section, you will get a list of all available volumes present in your PC.

4. Click on the drive and select it whichever you want to re-partition.
5. Right click on the selected drive and choose Shrink volume option from there.

6. A new window will open up where you could find the total volume of the drive you select and the available space on that drive. Just, enter the amount of volume you want to shrink and this will be the size of the new partition.
7. The value which you will enter, should be within the limit of the maximum available space. Now, click on ‘Shrink’ button and wait until the process will complete.
It will create a new partition of your hard disk using Disk Management of Windows 10 operating system without formatting any data.
Note: The hard disk volume should be logical type. It is not possible to create more than four primary partitions. Dynamic Disks work well with this method.
Additional informations: With Disk Management, you can do the following tasks as mentioned below.
- Increase the size of a hard disk partition
- Decrease the size of a hard disk partition
- Create a new partition from the existed unallocated spaces
- Delete a existing partition (you can’t delete the Windows installation drive)
Use ‘EaseUS Partition Master (Professional)’ to Partition a Hard Drive of Windows 10/Windows 7/Windows 8.1/Windows XP Computer
Partition Master Professional (by EaseUS) is a brilliant tool that can resize the volume of a hard disk partition and create/delete a partition of a hard drive without touching the existing data (like images, documents, movies, songs, installed applications etc.). So far, I have described about how to create a partition in Windows 10/7 without formatting and with the use of diskmgmt.msc (disk management). As, this is a free Windows utility, it might have some limitations (extend volume limitation for NTFS). There might be a chance of accidentally data deletion if you don’t handle it properly. But, Partition Master Professional overcomes all the possibilities of loosing any data, as it comes with a beautiful graphical interface. So, a common Windows user can handle it effortlessly and there is no fear of getting any data lost. This is a paid utility which costs $39.95 (according to today’s price tag). Though, a free version of Partition Master is available with some limited functionality. Download links are given below.
Now, here is a step-by-step guide to make changes in hard disk partition with Partition Master (free and professional).
Download the EaseUS Partition Master from the official website (link URL is given below).
Install the software and launch it. It will show you all the available hard disk partitions in a listed format.
Select the partition you want to resize.

Select the option Resize/Move partition from the left pane to shrink the volume. You will get the same option from the right click context menu also. Just right click on the drive you want to part and choose the Resize/Move partition option.
A pop-up window will appear from where you will be able to resize the partition or generate some unallocated spaces so that you will create a new partition using that spaces.

Click OK to create an unallocated space there in your hard disk.
Now, either you will create a new partition with that spaces or you can add those spaces to an existing drive.
To add some additional spaces to a hard drive partition, just follow the same technique. Select the disk partition, right click on it and choose Resize/Move partition and add some MB of spaces there.
Thus, using Partition Master, you can make changes in hard disk partition(s) without formatting (or loosing any data).
Download URL:
http://www.partition-tool.com/personal.htm
http://www.partition-tool.com/professional.htm
Repartition Hard Drive without Loosing Any Data Using “AOMEI Partition Assistant Professional”
Disk Management of Windows 10, can only shrink the volume, create some additional unallocated spaces and thus is used to partition the hard disk somehow. But, actually it can’t repartition the Windows hard disk as a whole. AOMEI Partition Assistant utility is the standalone software that can exactly repartition the hard disk and does some additional tasks like extend partition, merge partition, split partition, change partition label, disk copy, partition copy, migrate OS to SSD, convert NTFS to FAT32, convert hard disk to dynamic disk etc. It works in hardware RAID and in all major versions of Windows (Windows 7, Windows 8 & 8.1, Windows 10). All the data remain in protected state while you re-partition the hard drive with Partition Assistant.
Lets see how to work with AOMEI Partition Assistant Professional.
1. At first, download the software from the link below:
http://www.disk-partition.com/download.html
2. Install and run the software then. You will get the list of all the hard disk partition there.
3. Choose anyone from the list and right click on the drive that you want to repartition. Select Resize partition from the right click context menu.

4. At the new popup window, use drag method to resize the volume of the partition. Of course, some unallocated spaces must be available there to increase the volume of the partition. Otherwise, you can drag the bar to left to free up some unallocated spaces.

5. Right click on the unallocated space and select Create partition option to partition the hard drive.

5. Click Apply to make all the changes in your hard disk partitions.
AOMEI Partition Assistant Professional is very useful when you face problems with low hard disk spaces. It costs $36.00 and a free version is available there (Partition Assistant Standard).
Increase Partition Size in Windows 10 and Windows 7 /8.1 without Formatting Using “MiniTool Partition Wizard”
MiniTool Partition Wizard is the similar software which can perform hard disk partitioning without data formatting. Windows Disk Management only can extend volume partition of a NTFS file system. If you are a FAT32 or other format user, then you definitely need such third-party software. Above all, this application is very much secure as far data protection is concerned. Now, give a quick look on how MiniTool Partition Wizard works and partition hard disk without formatting.
1. Download the free version of the software from the link:
http://www.partitionwizard.com/free-partition-manager.html
2. Install and run the software, choose the partition which needs to be extended. Right click on the volume and choose Extend option.

3. Choose unallocated space from the hard drive. Otherwise, you can choose a partition from where you can take some space to extend the selected volume.
4. Drag the slider to manage the spaces, click OK and Apply to make all the changes.
I love this software because, to extend the partition it can take free spaces from the other partitions which are available in the same hard disk.
Final Words:
In this tutorial, I have discussed how to partition hard drive without formatting it. I have mentioned four best ways for performing the same tasks. However, if you find any tool more useful which can do the same task in an easier way, just leave a note in ‘contact us’ section.


