How to Protect USB Drives from Viruses and Prevent Virus Spreading – Windows 10/8.1/7
USB flash drive is the thing that we regularly use in our digital life. It is a very useful portable utility to carry data, important documents and music, videos etc. We carry the flash drive everywhere with us and share, transfer files between PCs, modern smartphones and tablets. So, there are always chances for any portable devices (mainly for USB flash drives) of getting infected with dangerous viruses, malware etc. Virus creators always target such USB flash drives/pen drives so that the viruses can spread easily. A flash drive is infected by the virus as soon as it is inserted in the USB port of a virus infected PC. Mainly these infections can occur when you insert your USB device to a public computer e.g. cyber cafe computer, school computer, library computer, office computer etc. As soon as you insert the infected USB device to your own laptop/PC, there is a high risk of virus infection unless you use a good and updated total security software in your Windows computer. Sometimes, the infected malware are so dangerous that even antivirus can’t detect it. The same thing happened to me few days before. I went to a cyber cafe to make a print out of some important office documents. I didn’t know that the computer of the cafe was infected by a shortcut virus. Later, I inserted the drive in my PC and the PC also got infected with the annoying virus. Thankfully, I managed to recover my PC from the shortcut virus successfully. So, USB drive might be a threat for you to lose important data, documents and files and endanger the security of other PCs if the infected flash drive is plugged in.
I have been searching for an absolute solution to protect my USB flash drive from viruses and secure it. At last, I have found a solution to protect any USB drive from virus infection if it is connected to a virus infected computer. Just make your USB flash drive write protected and secure the device from getting virus infection. Because, when you insert the USB drive to a virus infected PC, the virus can’t infect your flash drive because the virus script can’t inject any malicious script and files into the targeted device as the device is read only and write protection is enabled in it.
In this tutorial, I will discuss about two important things.
- How to secure and protect USB flash drive from getting the virus infection.
- How to configure your PC so that it can protect itself from USB pen drive virus attack.
Secure the USB Flash Drive and Protect it from Virus, Malware Infection
Write protect switch:
Few pen drives have a switch to make the pen-drive write protected instantly. When you turn on the write protection button, the flash drive will be converted to read only mode. When you insert the device to any virus infected computer, due to it’s write protection security property, the PC won’t able to transfer any virus to the USB drive. Thus, you can stop spreading the viruses to multiple computers. But, every flash drive does not have this special feature. They may use any write protection utility application to make the pen drive read only.
Ntfs Drive Protection:

“Ntfs drive protection” is the best tool I have found so far to make a USB flash drive secure. It not only helps you making the flash drive read only but also protect the drive from getting any kind of virus infection. Let’s see how it works.
- Right click on the USB drive and select ‘Format‘ option.
- Change the file system to “NTFS“.
- Now, run Ntfs Drive Protection tool and select your device under “Target Device“.
- Create a unprotected folder. This folder and it’s content won’t be write protected.
- Tick the checkbox “Reset Permissions on All Files“.
- Click the “Start Protection” button to make the device read only.
- You will get a successful message when done.
Now, when you try to copy anything to your protected pen drive, it shows you the following message:
You need permission to perform this action
But, you can copy anything to the unprotected folder in your flash drive. To unprotect the entire drive, just press the “Stop Protection” button.
Download URL:
http://www.sordum.org/8117/ntfs-drive-protection-v1-4/
Secure USB Flash Drive Manually and Prevent Virus Infection:
If you are mainly a Windows user, then you can protect your USB drive from viruses. But, before doing that you need to convert the file system type of your pen drive to NTFS from Fat 32. Fat 32 file system is good for the Linux and mac users. But, Ntfs performs well for the Windows users. However, if the size of the entire flash drive is less than 2 gb, then don’t convert it to ntfs as it might decrease the performance of the drive.
How to change the flash drive permission to make it virus protected?
- Insert the flash drive to the computer’s USB port.
- Go to device manager, under the disk drives choose the name of your flash drive and right click on it, choose properties from there.
- Under Policies tab, choose ‘better performance’ option and save it.
- Go to This PC, select the USB drive from the drive list, right click on it, select ‘Format‘ option.
- From the drop down menu of the file system type, choose NTFS.
- Click start button to format the USB file into NTFS file system.
- Next, Go to This PC, select the USB drive and choose properties option from the right click context menu.
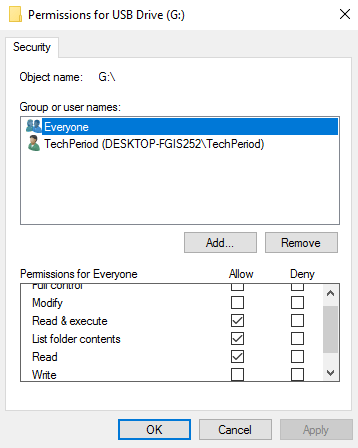
- Under security tab, choose Everyone from group or user names.
- Click on the Edit button to change permissions of the flash drive.
- Select only read only rights.

Save the changes, thus, you can make any external USB flash drive totally write protected.
Protect Your Windows PC from Virus Infected USB Flash Drive
It is not always possible to keep a virus infected USB away from your computer. So, the immediate duty for you to turn off or disable USB autorun feature. Any virus usually spread to PC from the autorun.inf file. So, if you disable the autorun feature, you can prevent the USB virus from auto infecting your PC.
To disable autorun feature of any removable USB devices follow these steps:
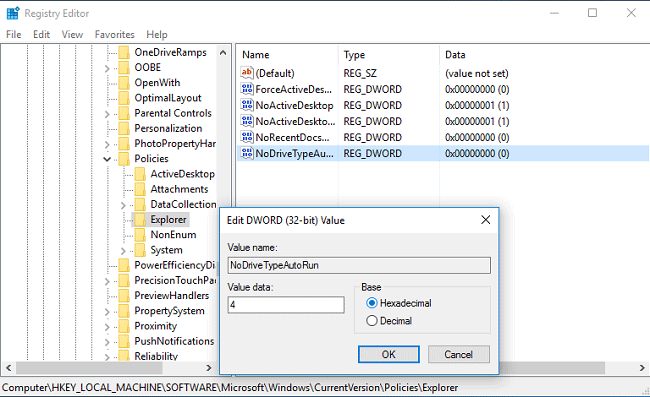
- Open registry editor.
- Go to the following key – HKLM\Software\Microsoft\Windows\CurrentVersion\Policies\Explorer
- Create a new dword 32 bit value with the name “NoDriveTypeAutoRun”

- Modify it’s value to ‘4’.
- Restart the Windows explorer using task manager.
Thus, you can turn off the autorun feature of any removable external USB drive in your PC.

There are few tools which make your job easier. These tools gives protection to your PC from any USB flash drive virus infection. They even scan any removable device and remove the viruses when inserted. Phrozen Safe USB is the most efficient tool among all. From the system tray, you can make any USB drive read only. Even it helps you to disable all the USB devices to your PC. You can download the software from the URL:
http://download.cnet.com/Phrozen-Safe-USB/3000-2094_4-75764250.html
Use “USB Disk Security” to Protect Your PC from Virus Attack
USB Disk Security is a freeware which (if installed) protects your PC from virus infection from USB device. It also prevents unauthorized users from copying any data of your USB drive. The tool also prevents unknown persons from from connecting pen drives to your PC. Thus, you can stop any kinds of threats from USB drives.

“Safe Open” option lets you open USB drives safely without spreading viruses. USB Disk Security also scans your USB and deletes viruses, infected files, malware if any.
In this tutorial, I have mentioned the ways to secure USB flash drive and protect them from getting virus infection. Moreover, you should disable autorun feature for removable USB devices to protect your PC from USB viruses. Don’t forget to share your opinion if you find any better option.
Also useful: Remove shortcut virus permanently from USB and PC


