How to Create Bootable Flash Drive to Install Windows XP from USB
Windows XP is one of the popular OS Microsoft have ever introduced. In the era of Windows 10, the demand of Windows XP is too high. Though, Microsoft does not provide any support to XP users now, yet the usability of this Windows version can’t be compared with other versions. XP supports at very low ended PC and performs well. So, in different sectors and studios, there is still a demand of Windows XP. There are many PCs and notebooks which do not have any CD/DVD ROM support. So, you need to install Windows XP from USB flash drive to those devices. Apart from that, many PCs do not have a working CD ROM and those PCs also need a bootable USB drive to install a Windows XP operating system.
Later versions of Windows e.g. Windows 7, Windows 8, Windows 8.1 and Windows 10 are very easy to handle at the time of creating a bootable pen drive as compared to Windows XP. You can use Microsoft’s “Windows USB/DVD Download Tool” to create a bootable USB stick for Windows 7 and later versions. But, this tool does not have a support for Windows XP. And when you want to create a bootable flash drive for Windows XP, you face a lot of difficulties and you need to follow few advanced steps because Windows XP does not have the feature ‘boot from USB‘ feature. Yet, you can install Windows XP from USB if you make it bootable properly.
In this article, I am showing you how to install windows XP on a PC using a USB flash drive. This procedure lets you install Windows XP OS on a netbook or on a PC that may not have a working CD/DVD drive. Yet, in order to prepare the bootable USB, you need a computer with a CD/DVD drive support and Windows XP installation disk.
When you insert the WIndows XP bootable installation disk into the CD/DVD ROM and restart your computer, you find a screen along with the following message: “Press any key to boot from CD…”. You get this message as the inserted CD or DVD is a bootable one. When you copy every file of the installer CD and paste it to a USB drive, and then restart your PC, the same thing does not happen to you. You need to make the USB drive bootable and as Microsoft’s USB/DVD tool does not support Windows XP, so, things become a little trickier for you. A free tool “Win to Flash” can be used to transfer bootable Windows XP installation files to a USB flash/pen drive.
There are another few market available apps to create a bootable USB (I also discuss about them in the later part), the latest version of “WinToFlash” is very appropriate for creating Windows XP USB. The free app also supports the creation of Windows 7,8.8.1 and Windows 10 bootable USB.
Now, let me discuss the best way to set up a bootable USB for Windows XP step by step.
Create Bootable USB and Install Windows XP from USB on a PC or Notebook
To install Windows XP operating system on a Windows PC, you have to follow the below steps.
- Preparing a USB thumb drive to create a bootable USB flash drive.
- Setting up the BIOS configuration of your PC to install Windows XP using the USB disk.
- Install and run Windows XP from USB.
- Handling with errors during Windows XP installation.
Step #1: Prepare Your USB Thumb Drive to Create Bootable USB Drive
Requirements:
- USB 2.0 (Minimum 2gb drive space)
- Windows XP bootable installation CD/DVD or ISO
- WinToFlash (download link) free app
Now, follow the below guidelines so that you can easily create a USB flash drive for Windows XP installation.
- First, download the ‘WinToFlash‘ from the above link. The portable edition of this tool does not require any installation.
- Just open the app and select the ‘Advanced Mode‘. Under ‘Task‘ option, just select “Transfer Windows XP setup to USB drive“. See the screenshot below.
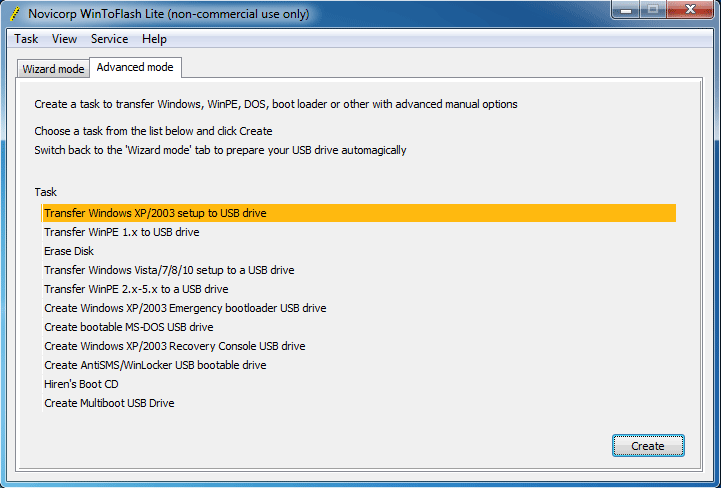
- Click ‘Create‘ button to go to the next window.
- Tick the “Use my ISO, RAR, ARJ, ZIP, 7Z, CAB, DMG image or archive” option.
- Select Windows source path then.
- Then, under USB drive, select ‘Refresh‘ button to get the list of all USB drives attached to your PC. Select the USB from the drop-down that you prefer to create bootable USB for Windows PC.
- Tick the option which says – “Remove the read-only attributes from files“.
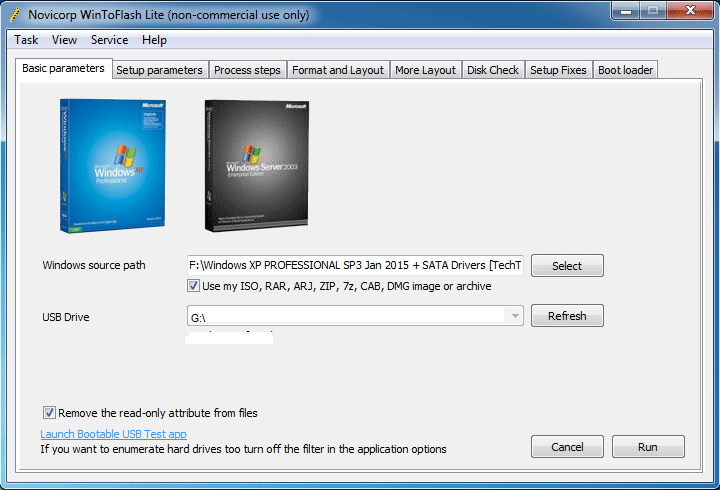
- Under ‘process steps‘ tick the following options: format drive, collect information of text mode, collect information of GUI mode, create folders structure, copy files, install boot, assign a drive letter for set up, create answers file, add additions files for installation process, check the USB drive for errors, transfer all folders from original image.
- Go to ‘boot loader‘ navigation menu and choose ‘GRUB’ boot loader from boot loader option.
- Click ‘Run‘ button and wait until the bootable copy of Windows XP operating system is created on the USB flash drive.
- After successful completion, safely remove the USB drive from the PC.
Now, you can install Windows XP directly from the newly prepared USB. The process of installing the OS to the new PC is very simple if you have the proper boot device configuration in your PC. If you have the proper boot configuration, then insert the USB to the PC where you want to install Windows XP. Otherwise, go to next step to know how to set up the BIOS configuration of your PC so that you can directly install Windows OS using bootable USB thumb drive.
Step #2: Configure BIOS Setting to Install Windows XP from External USB Pen Drive – Choose Boot Device Priority
After successfully creating a bootable USB drive, insert the USB to the PC in which you want to install the OS. Then restart your PC and keep pressing Del/F2/Esc key to enter Bios mode. The key may vary due to different motherboard configuration.
- Enter in the BIOS setting page and navigate to the boot menu. Change the boot preference there. Select ‘Removable disk’ as first boot device.
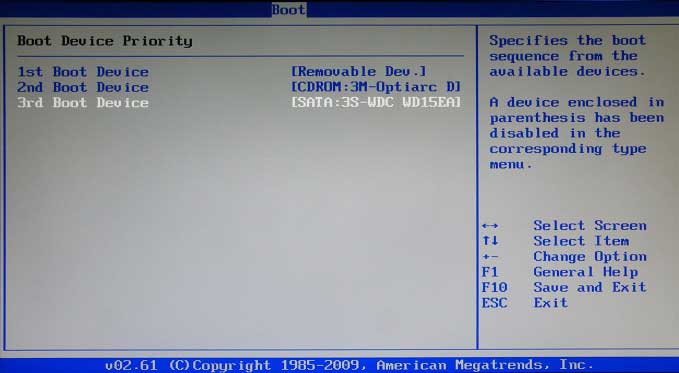
- Press F10 to save the set up and exit.
- Restart the PC once again and when you get the option “Press any key to boot from USB/CD…“, just hit any key to install Windows XP to that PC from USB device.
Step #3: How to Install Windows XP from USB Device
Before installing Windows XP on your PC, you need to create new partition on your Windows hard drive or you need to edit the existing partition table. But, create, delete or edit of a hard drive partition using Windows XP is not simple like Windows 7 and later ones. While installing Windows XP from a USB or from a bootable CD, you need to create partition using DOS based set up. Later, the text based setup and GUI setup can be seen. So, you can get a complete guide of installing Windows XP here with an image representation.
Step #4: Bypass Windows Blue Screen of Death while Installing Windows XP Using Bootable USB

At the time of installing Windows XP, you may notice the error message with a blue screen. This may occur due to the following reasons:
- ACHI is enabled. Change SATA disc controller configuration and disable ACHI and try to re-install XP.
- Lack of disk controller or bus (miniport) driver.
- Low space in installation drive.
When an error occurs, try to trace the root cause for the error and know what type of error that is. Then, you can only find the proper solution before you install Windows XP from USB flash drive.
Alternate Method to Create a Bootable USB Disk and Install Windows XP to PC/Computer/Laptop
As I have already mentioned that creating a Windows XP bootable USB is a bit difficult as compared to Windows vista, Windows 7 and the later versions of Windows. ‘Windows to Go’ is a brilliant feature that Microsoft includes in Windows 8 and later OS to create a portable USB version of the operating system. But, in case of Windows XP, you need to use a different technique. You can create a bootable Windows USB by just extracting the setup files to USB device and this method is not compatible with Windows XP. So, lets see how to prepare a USB drive and make it bootable with Windows XP. And this procedure requires a fully functional Windows XP operating system.
- Download and install BartPE builder from the following URL:
http://www.nu2.nu/pebuilder/and install the OS toC:\pebuilder. Start PE builder and browse the source Windows XP files and point it. Make sure that you set the output for “BartPE”. Set the media output as “Create output image”. You can set the output name as ‘pebuilder.iso’. The full path looks something like that –C:\pebuilder\pebuilder.iso. Press ‘Build’ to create ‘pebuilder.iso’ file. At first, make sure that the file is properly created. - Create a bootable USB drive for Windows XP: Insert the USB drive to proper port and launch ‘Power ISO’. From the menu, navigate to Tools >> create bootable USB drive. The dialogue with “Create bootable USB Drive” appears as a pop-up. Confirm the UAC to continue. From ‘create bootable USB’ dialogue window, click “…” button and open the “c:\pebuilder\pebuilder.iso” file. In “Destination USB drive”, choose the correct USB drive. Choose writing method as ‘USB-HDD’. Then, click the ‘Start’ button to start creating bootable flash drive for Windows XP.
- After successfully completion of the process, copy setup file (from i386 folder) of Windows XP to USB drive. That’s all. The USB drive is ready now to install Windows XP from USB.
- Launch Windows XP setup from a flash drive: Plug-in the USB device to your PC. Run the command:
{usb drive letter}:\i386\winnt32.exe /syspart:C: /tempdrive:C: /makelocalsource. ‘C:\’ is the drive where you want to install your Windows XP. You can change it if you want to install the OS on a different partition. At the time of this installation process, if you see the notice which says: “Do you want to convert the installation volume to NTFS?”, just answer ‘No’. After that the setup program closes automatically. - Reboot your PC and unplug the USB this time. Change the BIOS setting and select boot device priority to “boot from hard disk”. Now, you are done and just wait until installation finishes.
Final Words:
If you follow on screen instruction while installing Windows XP to any PC, it will be much easier for you to install and run the OS from USB. So far, I try to cover two best methods along with associated steps, problems and solutions to install Windows XP to your PC. If you find any better way to install Windows XP to a PC or to a notebook, don’t forget to drop comment in below comment section. However, if you wish to install the latest OS i.e. Windows 10 in your PC, read our guide on installing Windows 10 from bootable USB.
Related Posts
How to Fix Windows Hardware and Devices Problems with Built-in Troubleshooter
Eight Important Steps to Stay Safe while Using the Public Wi-Fi
How to Block Annoying Facebook Game, App Requests
About Author
Jit Dutta
Jit Dutta is a web geek who loves to write articles related to PC and the Internet which helps common people to solve their problems and queries. Email: jit[at]techperdiem.com

